I don't really garden at the North Pole. My Dad, who lived in Arizona, insisted that any place that could have 50 degree days in mid-summer must be at the North Pole. So now living at the North Pole is a running joke.

17 April, 2012

Homemade Sub-irrigated Planter or Self-watering Container

My daughter came across a Reddit post about a seed library where you can check out seeds and then, after you grow them up big and strong, you return seeds you harvest to the library for someone else to check out.  Too cool, huh?  Even better, this is in Tucson, where she happens to be!

This sparked an interest in gardening in Arizona, which is surely a challenge.  The challenge played around in my brain for a few days until suddenly, from some dim recess, came the memory of a YouTube video I'd seen on making your own Earthbox-type planter.  Well, what a perfect application for this kind of technology!

The concept is brilliantly simple.  You have a planter that is divided.  The bottom is a water reservoir and it is separated from the top, where the soil-less growing medium lives, by an "aeration screen".   Connecting the two areas is a wicking tube, which is perforated and contains potting mix that serves to wick the water up into your top planting area.  There is also a fill tube, so you can add more water to the bottom without pouring it through your growing medium.  Keeps things tidy.

(If you want more info on what an Earthbox-type planter is and does, and more ideas on how to make your own, do a search on "homemade earthbox", or something similar.)

Using just a few things, most of which were already around the house, I made a small sub-irrigated planter (SIP) today.  Pretty easy, in spite of it being bitter cold and spitting snow today!

Sub-irrigated Planter

Ingredients:
- plastic storage box with lid
Basic parts of the SIP
- quart-size yogurt containers
- 3/4"  tubing, about 14" for mine
- 2 zip ties
- box cutter
- tape measure
- Sharpie
- drill with 1/4" or 3/8" bit
- tin snips (helpful but not mandatory)
- peat-based potting mix (not potting soil)
- basic granulated fertilizer
- dolomite
- plants

Steps:

Wicking tubes and aeration screen supports (yogurt containers)


1.  Decide how deep your water reservoir will be, which will depend on your container size and water needs.  For this one, 2 1/2" was fine, which meant, surprise!, I could just cut my yogurt containers in half so there was no waste!
    Using a tape measure and Sharpie, I drew a line around the containers and, using a box cutter, carefully cut each in half.  The bottom halves will be wicking tubes and the top halves will be supports.


Supports & wicking tubes in place
2.  With the drill, make holes in the sides of all the wicking tubes pieces until each has a dozen or so, or you are bored of making holes.  Then make a few holes in the bottoms of your wicking tubes.

Aeration screen (lid of planter)

3.   Measure the inside dimensions of the box at the top of the wicking tubes/supports.  Mark this on your lid.  For this one, the measurements coincided with the edge of the nifty raised thing in the middle of the lid!  Carefully cut this out of the center of the lid with the box cutter, leaving the outer edge intact, as well as the center.
Tin snips, box cutter and gutted lid

My lid had some fins on the inside (for extra strength, I'm sure) that were difficult for the box cutter to get through.  The tin snips made short work of them, however!


4.  Mark where the wicking tubes will be on your soon-to-be aeration screen.  Use the base of the yogurt container to draw a rough circle for each.  Now find some round and somewhat smaller item and trace a smaller circle inside the first circle. 
Aeration screen w/ wicking tube holes


5.  Drill holes all over your aeration screen, except inside the wicking tube circles.  Cut out the smaller circles. 


Fill tube tubing
Fill Tube (plastic tubing and zip ties)

6.  Measure the full depth of your box and add a couple of inches.  Cut your tubing that size.

7.  Your fill tube needs to run below your aeration screen, so cut a notch in a corner of your aeration screen big enough to accommodate the fill tube.

Fill tube cinched in place & wicking tubes filled with potting mix
8.  The zip ties will hold the fill tube close to the inside of the planter.  Mark a dot on either side of the tube, just a titch below the aeration screen,  and another set near the top of the planter.  Drill holes at each dot.  Cinch the fill tube to the planter with the ties.  The lower holes will also act as drain holes, in case your planter gets over full in a rainstorm or something.  You might consider a cover for the fill tube so ickies don't get in (i.e. mosquitoes).

9.  If you desire, cut a notch in the lid edge to fit around the fill tube.  You can use this lid edge to hold plastic sheeting in place as a mulch.  Or just to give the whole thing a more finished look.


Assemble the whole deal

Center the wicking tubes under their holes in the aeration screen and pack them with potting mix.  

All that is left is to fill the planter with water, soil-less potting mix, fertilizer, dolomite, and plants.  The water part is easy: run water into the fill tube until it starts leaking out the drain holes.  For instructions on setting it up with the rest, I recommend using the instructions on the Earthbox site: http://www.earthbox.com/instructions.asp .  They also have a nice forum with helpful advice and experienced users: http://forum.earthbox.com/ .

I want to make one of these out of a plastic barrel.  We'll see how that goes!
28 March, 2012

Is It Really 2012?

It appears that I missed documenting an entire gardening season!  2011 must have been a stealth year... 

Last year's garden was good; not phenomenal, but plenty good enough!  The weather was a little strange, with the leafing out of the trees delayed by 2 weeks because it was so cold and dreary and then it turned hot and pretty dry.  A lot of folks up here don't have air conditioning because you really only NEED it for a few days of the summer, so it must have been hard on them.

There were a few new things in the garden last year.  One of the best was a complete accident.  Mixed in with the Opalka tomato seeds, which was a new tomato for me and a good one, was what turned out to be a Cherokee Purple tomato.  The tomatoes are described as rivaling Brandywine and my husband thought they were one of the best he has had!  The plant is really tall - about 5' to 6' - and needs support especially since the fruit is big and plentiful.  They are indeed purple-y, a little gnarly in appearance and should be harvested before you think they look ripe, but are truly wonderful tomatoes.  Needless to say, I saved seeds and have started more for this year.

Other new things were included in the 2011 garden:
  •  Opalka paste tomatoes, which were huge (both the tomatoes and the plant - again 5' to 6') and have an even bigger place in this year's garden plans.
  • Garlic.  A little experiment that turned out to be very cool.  They looked just like (small) garlic bulbs when I harvested them!!!  Really!  They have a place in the 2012 garden also and are, in fact, already up!
  • 'Speedy' bush green beans, which looked a little peaked when they first started growing, but were very serious when it came to producing beans.  And tasty!  They definitely earned a long-term place in the garden.
  • Rapini, which I planted too late, or it got hot too early.  We will try again.
  • Pie pumpkins.  They are big-time space hogs but really nifty to grow and make great pies.  Better than the canned stuff, even if less convenient.  We tried 'Snack Face' and 'Winter Luxury' and will grow them again this year, with heavy=duty trellising.
  • 'Mucho Nacho' jalapenos turned out to be too hot for even the hardiest fire-eaters in my family.  They requested I not grow them again, but maybe the 2011 crop was just trying too hard; we'll cut back to one plant in 2012.
  • 'Aruba' peppers were not an oohh! ahhh! addition to the garden but produced lots of peppers good for everyday use.  They'll be back this year.
  • The Serrano peppers were not particularly spicy, but had a different flavor than a jalapeno that was good in salsa.  The plants were lovely: a nice grayish leaf with loads of shiny green, then red, peppers. 
  • German Butterball potatoes were a hit!  They are, indeed, buttery potatoes, straight from the ground.  They were also prolific, which I appreciate.  Again, a repeat for 2012.
  • Leeks.  Pretty easy to grow and were space efficient.  We'll grow a few this year.
  • Saving tomato seeds!  Next year I will see about saving other kinds of seeds as well!
Highlights, and lowlights, of the 2011 garden included:
  • Raspberry harvest was tremendous!
  • The summer squash plant died right off.
  • Sweet potatoes grown in large plastic storage bins did a lot better than those grown in the ground the previous year.  Sweet potatoes require more "heat days" than we really have and I think the bins allowed the roots to get warm enough to grow (somewhat) bigger.  To further the experiment, we will try again.
  • Lots more potato beetles than usual.
  • Peppers make great landscape plants!
  • A woodchuck dug a nice entrance to the garden for himself.  It started under a raspberry bush and extended 8' or 10' into the middle of the potato patch, going under a block wall.  He also apparently ate all the Brussels sprouts plants, although some may have succumbed to cabbage moth caterpillars.  We will be vigilant for both predators this year.
  • Dan designed and built a great tomato support system!
  • At the very end of the season, I made a greenhouse over half the garden.  It protected the peppers and tomatoes for a couple of weeks and allowed a lot of fruit to mature enough to harvest.  It was especially helpful with the peppers.
  • The hardest thing that happened this last gardening season is that my Golden Retriever gardening buddy died.  Zoe is sorely missed, not only in the garden, but in every aspect of our lives.  She was good for us, as we were good for her.  A RAGOM volunteer has this quote on her emails, which I hope she doesn't mind if I quote here: 
It came to me that every time I lose a dog they take a piece of my heart with them. And every new dog who comes into my life gifts me with a piece of their heart. If I live long enough, all the components of my heart will be dog, and I will become as generous and loving as they are. - Unknown
 
Like many gardeners, I was ready for the end of the gardening season when it came.  Now that Spring is here (early), I'm ready and excited to start anew!  Next post, I need to track the seed starting.  Yawn, you might say, but the popping up of new plants from seeds is like magic to me!

Green dreams to all!
Cindi

11 September, 2010

The Vacation Garden

As I mentioned in the previous post, we drove to Arizona recently.  And back.  With a dog.  During harvest time.  With 80 pounds of Hatch chiles.

Probably the most stressful aspect was leaving the garden during harvest.  For a non-gardener, that might seem really silly, but for a gardener, it is perfectly understandable, or so I like to think.  However, I had back-up.  Our son lives not far away, is interested in gardening, doesn't have his own yet and was kind enough to tend mine.  Fortunately also, it rained a lot and was cool, so plant stress was low and ripening slowed a bit.

There was still plenty to harvest, as evidenced by the buckets, baskets and bowls of produce covering the kitchen floor.  So now it is on to cataloging the haul and preserving the harvest.

Prickly Pear Jelly - Recipe

The Minnesota State Fair has just ended, but we didn't go this year.  Instead, we drove to Tucson to visit family!  It was a great trip, if a long one, especially considering we spent 28+ hours each way in the car with a large Golden Retriever.  But she got a bath before we left and loves to ride in the car.

We had multiple goals for this trip - visiting my mom, brothers, aunt and daughter, delivering goods to said daughter for the school year, and, lastly, getting peppers from Hatch, New Mexico.  I will have to explain the peppers in another post, but they are a really terrific accidental discovery. 

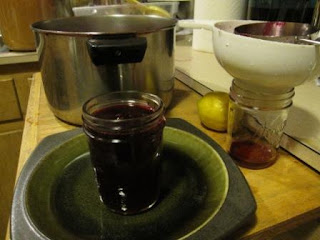
Filling jars with Prickly Pear Jelly
Combining the spirit of the state fair and Tucson, the last thing we did before we left Mom's house was pick what turned out to be 13 pounds of prickly pear fruit.  What?, you say.  And why?  To make Prickly Pear Jelly, of course!


Prickly Pear Jelly

Supplies:
  • 8 pounds of ripe prickly pear fruits (also called tuna), for 8 cups of juice
  • 1 cup lemon juice
  • 1 cup unsweetened, unfiltered apple juice
  • 2 boxes low-sugar pectin
  • 4 cups sugar
  • 1/3 cup honey